2026 How to Replace Your Cabin Filter in Simple Steps?
When it comes to maintaining your vehicle, the Cabin Filter is often overlooked. This essential component helps ensure clean air inside your car. However, many drivers are unaware of its importance or when to replace it. A dirty cabin filter can lead to unpleasant odors and poor air quality. This can make your driving experience uncomfortable.
Replacing your cabin filter is a simple process that anyone can learn. With the right tools and guidance, you can do it yourself. Imagine breathing in fresh air instead of allergens and dust. That’s one immediate benefit of a new filter. It doesn’t take much time, but the rewards are significant.
Many people let this task slide. They forget or think it isn’t necessary. A neglected cabin filter can lead to issues with your vehicle’s HVAC system. It’s worth taking a moment to reflect on the importance of this small part. The air you inhale matters, especially on long drives. Knowing how to replace your cabin filter will enhance your comfort and well-being.
What is a Cabin Filter and Its Purpose?
A cabin filter is essential for any vehicle. It prevents dust, pollen, and other particles from entering the cabin. This filter helps maintain clean air for passengers. Without a cabin filter, the air can become stale and unhealthy. Many people underestimate its importance.
In terms of maintenance, it is recommended to check the cabin filter regularly. Changing it every 15,000 to 25,000 miles is a good rule. Sometimes, you might forget it’s there. This can lead to poor air quality and unpleasant odors inside the car. Take a moment to ensure it’s in good condition.
Tip: Make a schedule for routine checks. You could use a calendar or a reminder app. Inspect the filter visually. If it’s dirty or clogged, replace it. Clean air makes a big difference during long drives or commutes. Another tip is to note your filter's replacement date. Keeping track helps avoid unexpected surprises.
Cabin Filter Replacement Frequency Analysis
This chart represents the average frequency of cabin filter replacements based on vehicle usage patterns. Regular replacement helps ensure optimal air quality and comfort inside the vehicle.
Signs That Indicate Your Cabin Filter Needs Replacement
As you drive, a clean Cabin Air Filter is essential for fresh air inside your vehicle. If you notice strange smells or increased dust, it might be time for a replacement. According to the Society of Automotive Engineers, a clogged filter can reduce airflow by 50%. This not only affects comfort but also the efficiency of your vehicle’s HVAC system.
Look for signs of discoloration or any visible debris in your cabin filter. If you find it dirty, it could harm your health. Poor air quality can trigger allergies or respiratory problems. The American Lung Association notes that indoor air pollution can be worse than outdoor levels. Change your filter regularly for better air quality.
Tip: Check your owner's manual for replacement intervals. A good rule of thumb is every 15,000 to 30,000 miles. Inspect the filter more often if you drive in dusty conditions. Remember, forgetting to replace it can lead to costly repairs in the long run.
Tools and Materials Required for Replacing a Cabin Filter
When it comes to replacing your cabin filter, having the right tools and materials will make the process smoother. You will need basic hand tools such as a screwdriver. Pliers may also come in handy for difficult clips. A clean cloth is essential to wipe away any dust from the filter area.
Don’t forget the replacement filter itself. Make sure it fits your vehicle’s specifications. You might also consider using a vacuum cleaner to remove loose debris from the area. Sometimes, you may find that older vehicles have rusted screws that are tough to remove. It's crucial to be patient and use the appropriate force.
After gathering all your materials, you might feel ready, but don’t rush in. Take a moment to review your vehicle manual. This step can provide additional insights and prevent mistakes. Addressing overlooked issues, like dirty vents, is also important. Each detail matters in ensuring you breathe clean air inside your vehicle.
Step-by-Step Guide to Remove the Old Cabin Filter
Replacing your cabin filter might seem daunting, but it’s a manageable task. The cabin filter plays a crucial role in ensuring clean air circulates in your vehicle. According to industry reports, clogged filters can reduce airflow by up to 50%. You might not notice this decrease, but it can impact your driving experience significantly.
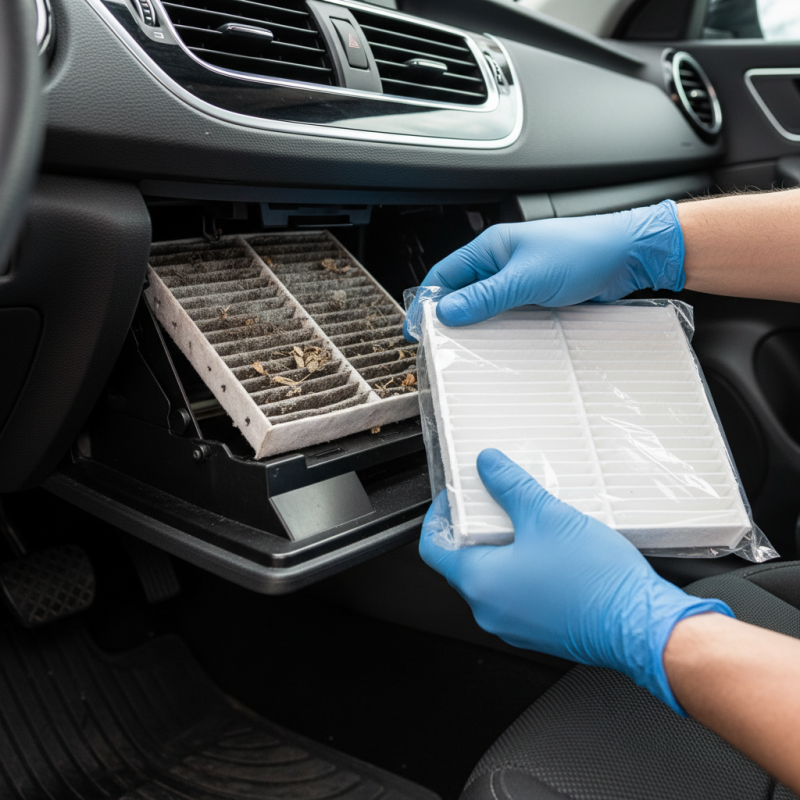
Start by locating the cabin filter, typically found behind the glove compartment or under the dashboard. Carefully remove the cover, ensuring you don't break any clips. Pay attention to the filter’s orientation as you remove it. This step is critical; reversing it can affect airflow quality. Make sure to inspect the old filter for dirt and debris, which can alert you to other potential issues.
**Tip:** When installing the new filter, double-check that it fits snugly. An improper fit can lead to noise or decreased airflow. Remember, air quality matters. If you face difficulty during removal, consider checking online tutorials or vehicle manuals for guidance. Mistakes can happen, like breaking a clip, so be gentle. Always take your time and work carefully. Your comfort and safety depend on it.
Installing the New Cabin Filter: Tips for Success
Replacing a cabin filter can seem daunting, but it doesn't have to be. Start with a few simple tools: a screwdriver, a vacuum, and, of course, the new filter. Make sure the new filter matches the old one. This step is crucial. A mismatched filter may cause airflow issues.
When you're ready to install, take your time. Remove the old filter gently; debris may fall out. It’s a good idea to vacuum the area where the filter sits. Dirt buildup can affect performance. Pay attention to how the old filter is positioned. You’ll want to insert the new one the same way. Secure everything back in place carefully. A loose filter can rattle or fail.
Finally, test the system. Turn on the air and check for changes in airflow. If it still seems weak, you might need to redo the installation. Don't rush through it. Each detail matters. Reflect on what worked and what didn’t. Over time, this process will become easier, but attention to detail is key to success.
2026 How to Replace Your Cabin Filter in Simple Steps? - Installing the New Cabin Filter: Tips for Success
| Step | Description | Tips | Estimated Time |
| 1 | Locate the cabin filter access panel. | Refer to your vehicle’s manual for specific location. | 5 minutes |
| 2 | Remove the access panel screws. | Keep screws in a safe place to avoid losing them. | 3 minutes |
| 3 | Pull out the old cabin filter. | Check for any debris in the cavity before inserting a new one. | 5 minutes |
| 4 | Insert the new cabin filter in the correct orientation. | Ensure airflow direction matches the markings on the filter. | 4 minutes |
| 5 | Replace the access panel and secure screws. | Double-check tightness to avoid rattles. | 3 minutes |
| 6 | Test the air conditioning or heater system. | Ensure airflow is consistent and there are no strange noises. | 2 minutes |
